Do not let the “magic” smoke out of the transformer made from Unobtainium.
You are about to plug in and power on your newly acquired radio for the first time. Or perhaps you finished replacing the power supply capacitors, pi filter resistor and selenium rectifier with a silicon diode bridge.
Now the thought occurs to you, “What if there is a short circuit or bad part in this radio? I could ruin the power transformer or arc over the power switch. I must use a current limiting device and observe the voltage and current draw of this radio.”
It is time to find your Variac (autotransformer), voltmeter and an amp meter. You slowly bring up the current while watching the volt meter, current meter and of course the dial scale lamps. Eventually the radio will come to life or your current meter will exceed the radio rating at some low input voltage and you stop. There is an easier and time saving way, a “Dim Bulb Tester” (DBT).
A DBT is a low tech way of adding an automatic self adjusting current limiter and visual indicator to protect your radio from short circuit damage. And it cost efficient. The DBT is not a panacea or total replacement for the Variac and meter but it saves time and is quickly used between restoration steps. Here is how to make and use one.
Caution – this is a home made custom test device that meets no electrical safety codes to my knowledge.
Collect some basic parts. These are common electrical building materials that may be in your storage bin. This example uses US parts. I should hope you can find your domestic equivalents:
- Power outlet/receptacle.
- Switch DPST preferred.
- Line/mains cord with attached plug. Use equivalent wire gauge as your radios (14-16 AWG).
- About 12 inches of extra wire of same gauge as above line/mains cord.
- Electrical enclosure to contain the outlet and switch.
- Electrical cover plate.
- Incandescent light bulbs of various wattage 40, 60, 75 and/or 100 watts. CFL will not work. These can be combined for additional wattage.
- Lamp Socket to plug adaptors.


The boxed swith on the left is the prefered DPDT (double pole double throw) switch.
The objective is to put the incandescent lamps in series with the radio. Use a lamp about equal to twice the rated wattage of the radio. Assemble the DBT in electrical enclosure.
“Tin” or coat the bare ends of all stranded wire with solder to reduce fraying.
The line/mains cord is connected to one side of the DPST toggle switch. Don’t forget to thread the line/mains cord into the electrical enclosure. Double check the eletrical operation of your switch if there is any question of how it works. The DPST switch is to completely disconnects the mains from the DBT and radio. Set this aside.
Picture 1. DPST switch wiring.
From a working DBT.
Schematic 1. DPST switch.
Schematic 2. SPST switch.

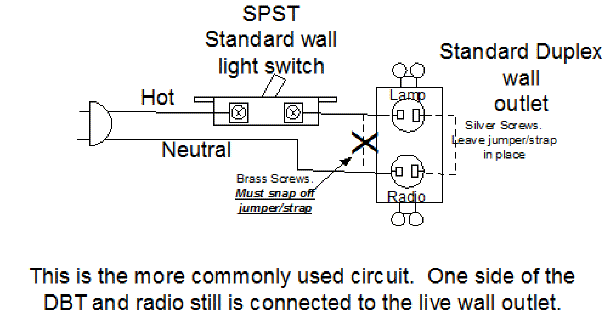
The left switch (SPST single pole single throw) has two screw (bass squares) connections. the Switch on the right (DPST) has four connections.
Change the duplex outlet from parallel to series connected outlets. This is done by snapping off the strap on the HOT side of the duplex outlet. Leave the strap on the neutral side.
Break off this strap on the Hot (brass colored) side of the outlet.
Connect the other side of the DPST switch to the two HOT screws of the duplex outlet with some short lengths of wire. Be careful to follow the Hot wire from the plug, through the switch to the top of the duplex outlet. This top is where I prefer to insert the current limiting incandescent lamp. The bottom outlet is nearest to neutral and is where the radio under test is connected. Label these individual outlets as appropriate.
Do not remove this Neutral strap on the silver colored screws.
There should be no connections to the neutral side of the duplex outlet. There is an exception: If your duplex outlet has no paralleling strap, a wire jumper will be needed to connect the two neutral screws together. A short 1 -2 inch bare wire should do fine.
Verify all connections against the schematic with a continuity tester. Then secure the switch and duplex outlet into the electrical box. Then cover with a cover plate, label the outlets as mentioned above. Add the light bulbs with the lamp socket adaptors for a complete Dim Bulb tester.
If your country has no duplex outlets or lamp socket to plug adaptors then a single outlet combined with a separate lamp fixture/socket may be used or two single outlets wired in series. Just screw in the appropriate wattage incandescent lamp into the lamp fixture/socket.
To use the DBT:
Plug in a lamp that is about 1.5 times greater than the radio’s wattage rating into the top outlet.
Plug in the radio line cord to the bottom outlet
Insure the switch is off. Insure the radio power is off.
Plug the DBT into a live outlet.
Turn on the radio.
Switch on the DBT.
If your radio exceeds the highest wattage single lamp you have, use a multiple outlet power strip to add lamps.
If the radio has NO short, the lamp should flash on bright then (with in about 2 seconds) dim out almost completely. After the tube filaments have time to heat up (30 – 90 seconds) and the tubes start to conduct the DBT lamp will glow dimly. You may or may not hear any thing from the radio. You have no short. You may now plug the radio directly into the wall.
If the radio has a short the lamp will immediately come on bright and will NOT dim out. Do not leave the radio powered up in this mode for long. Some thing may burn up. Do NOT plug the radio directly into the wall/mains outlet. Some thing is shorted and needs attention.
See my demonstrations of how to operate a DBT on YouTube.
I do have and use a variac and meter but using a DBT is quick and easy. It is convenient to use the DBT during the restoration process for those who like to test after measured steps of component replacement.
With a DBT there should never be a time when a radio with a short circuit is subjected to full line potential resulting in costly damage. It is a great substitute if there is no varriac available.
Good luck and happy restorations.
Paul Pinyot.
To thank the Author because you find the post helpful or well done.