Hardware-Platform STEMLAB125-14 or STEMLAB125-10
Required Hardware
As the software was initially developed specifically for the STEMLAB 125-14, all of the following descriptions are tailored to this device. Alternatively, COHIRADIA recordings have already been played back on the much cheaper STEMLAB 125-10 without any subjectively perceived loss of quality. This variant has not yet been extensively tested, but is most likely also sufficient for AM playback purposes with good level control. For this reason, the type designation is written STEMLAB 125-XX below, XX = 14 (fully recommended) or XX = 10 (not fully tested). In any case, we recommend the STEMLAB 125-14 for recording purposes.
-
basic RedPitaya STEMLAB125-XX package consisting of:
- STEMLAB125-XX main unit
- STEMLAB plug-in power supply unit
- LAN cable
- SD card with typ. 16GB
-
optional: housing for the STEMLAB
-
AM radio with external input for 'antenna' and 'earth ground'
-
plug adapter and coax cable for coupling between SMA output of the Stemlab and RF isolating transformer
-
PC with sufficient disk space for the data files.
-
RF isolating transformer (e.g. a balun) with a suitable transformation ratio from the 50Ω output of the STEMLAB to the radio. Usually an impedance transformation 1:9 to 1:16 (turns ratio 1:3 or 1:4) works for typical tube devices. In principle, any balun suitable for the respective frequency range can be used if the primary and secondary sides are completely separated (no common ground!). The author now uses a toroidal core FT114, material 43 with 15:60 turns, CuL 0.25 (inductance 120uH : 2mH), STEMLAB : Radio.
Installation of the server software on the STEMLAB125-XX
Normally, an SD card with the operating system (Ubuntu) is supplied with the purchase of a STEMLAB125-XX. This must now be inserted into the SD card slot of the STEMLAB. If you do not have this SD card, you have to create one yourself, the instructions for this and the required image file can be found on the Red-Pitaya Page
IMPORTANT: There are now newer versions of the operating system, most recently OS2.00. All previous COHIRADIA software versions have been tested under version 1.04, there is no experience with V2.00 yet. It is therefore recommended that you always use version 1.04-28 for COHIRADIA. If version 2.00 is preconfigured when purchasing a new STEMLAB and the COHIRADIA software does not run on it, it is recommended that you make your own SD card with version 1.04-28 and use this.
Translated with DeepL.com (free version) You can then connect STEMLAB to the Internet and call up an installation script kindly created by Ueli Kurmann. The connection can be made either by Ethernet cable or by a WLAN dongle via a standard router. The following steps must then be taken:
-
start a web browser (e.g. Mozilla Firefox) on the PC. On the web browser in the address field
http://rp-######.localwhere ###### stands for the MAC address (e.g. rp-f03e25.local). The MAC address is printed on the Ethernet connector of each STEMLAB.
-
wait until the STEMLAB apps are loaded in the web browser (this can sometimes take a while)
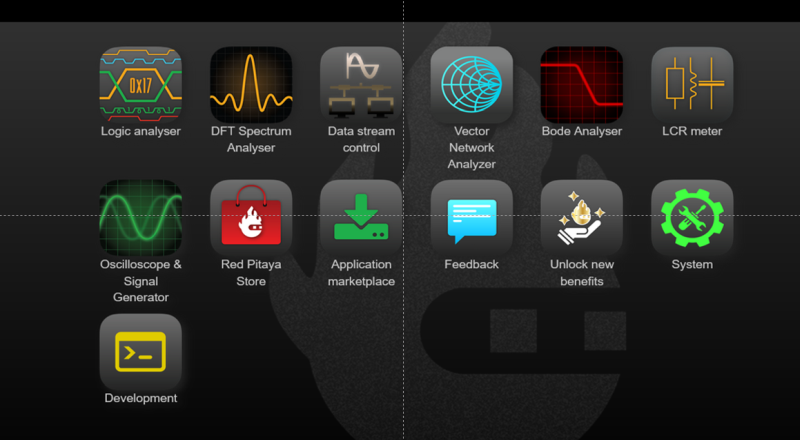 The view should be similar to the adjacent image. You can see a series of icons with which you can call up various functions on the STEMLAB. Only the 'System' icon is relevant for COHIRADIA.
 -
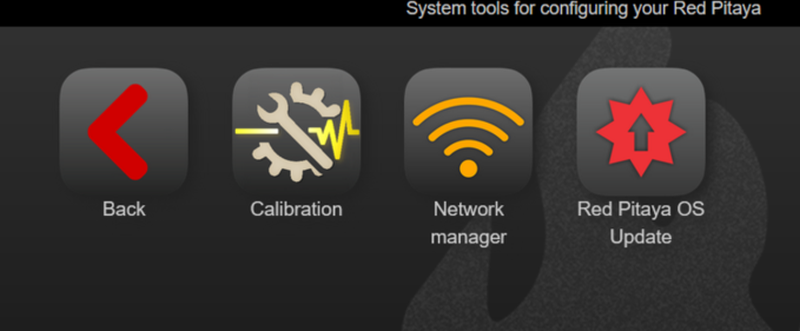
Open the folder „System“ by clicking on it and afterwards call the App „Network Manager“.
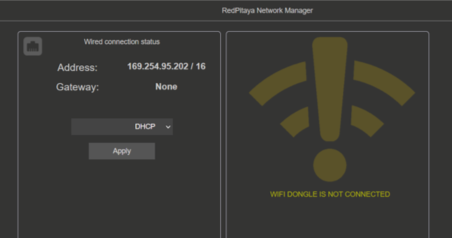
 In this manager the IP address can be read out which has been assigned by the router.
-
Open a command prompt window under Windows and log in via ssh on the STEMLAB125-15 with the IP address assigned by the router, username and password are 'root' and 'root'. (Port = port22). Typical call:
ssh root@###.###.###.###, Password: root###.###.###.### is the IP-address.
-
after Ubuntu has reported with the command line prompt, it is best to carry out a system update with 'apt update' and then install the packages with 'apt upgrade'.
-
after the upgrade, enter the following command in one line:
curl --silent --cookie "SCHLUESSEL=1" https://cohiradia.radiomuseum.org/install.sh |bash
STEMLAB then executes the installation script and creates a directory with the necessary shell scripts, the server program and the bit file for the FPGA.
-
after successful installation, shut down STEMLAB properly with the command:
halt
When the console reports that the connection has been closed and the red heartbeat LED on the STEMLAB has stopped flashing, the device's power supply can be unplugged again. The system is then configured for use in accordance with COHIRADIA.
Assembling the hardware
-
disconnect the STEMLAB from the router and connect it directly to the LAN socket of the PC using the LAN cable. **)
-
connect the SMA output socket 'OUT1' to the low-impedance side of the RF isolating transformer/balun via a 50Ω coaxial cable.
-
connect the antenna input of the AM radio to the high-impedance side of the isolating RF transformer/balun.
-
connect the plug-in power supply of the STEMLAB to the micro USB port for 'Power'. Alternatively, the STEMLAB can also be powered directly from a USB port on the PC using a suitable micro-USB cable.
See also the video tutorial. Although this tutorial refers to the use of the very first RFCorder version 1.0 (no longer supported), all higher versions can of course be used essentially in the same way.
**) According to the manufacturer, a WLAN connection can also be set up as an alternative to the LAN cable if a WLAN dongle has been purchased. However, the author has not yet tried this option himself. As a second alternative, the STEMLAB may probably also remain connected to the router, but the IP address assigned by the router would then have to be used. This mode is probably not relevant, as in practice the radio to be played is rarely located right next to the router. Also this operating mode not tested by the author.
Prepare playback app
There are several software versions available for playing archived recordings. All software can be downloaded from the Software page. It should be noted that RFCorder can only play wav files from version 2.0 onwards, the first version can only recognize the 'dat' format originally used in the first version. So far, only RFCorder v1.2 has a recording function. In addition to the full functionality of RFCorder 2.0, COHIWizard 1.0 offers many useful auxiliary functions for advanced COHIRADIA users. General procedure:
-
download the ZIP file of the desired software version to the PC.
-
unzip the file to a local directory (let's call it ~\LOCAL). The exe file as well as some auxiliary files and icons and the operating instructions (as pdf) are now created there.
-
afterwards the desired AM broadband data files (e.g. RM2006clip_fcorr_i16_C_lo1100_r1250_c0.dat ...) need to be downloaded from the Archive. It is recommended to save these files in separate directories.
All zip files contain the respective operating instructions. Although the video-Tutorial is no longer completely up to date with regard to some content (e.g. use of RFCorder version 1.0), it can generally be helpful as a supplement to the operating instructions.
A detailed summary of all components tested to date and an overview of alternative hardware can be found in the Report 2023.