ever: N3; Alignment
ever: N3; Alignment
Read the BEREC Matador instructions I wrote. The N3 has six rather than 4 adjustments. This allows more accurate alignment of LW and low end of MW.

Prop open the chassis with a block or reel of tape so the 6 trimmer capacitors are just accessible. Make sure there are no metal objects near the lid (loop aerials). Don't work on a Metal workbench!
Put the Generator coil / loop about 4 to 6 cm away behind a corner. Don't place it on or close to lid as that de-tunes the RF.
Trimmer functions
(Note that component designations may not match all schematics)
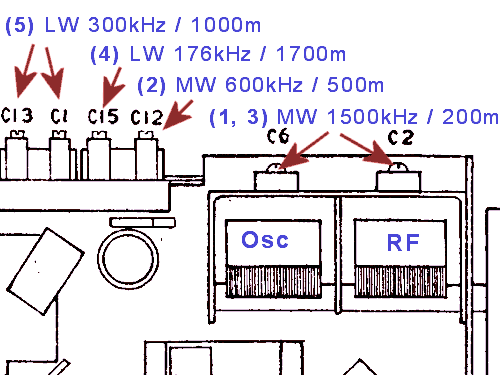
- C2 : RF high frequency padding (adjust only on MW 1500kHz/200m, affects MW & LW)
- C6 : LO high frequency padding (adjust only on MW 1500kHz/200m,, affects MW & LW)
- C12 LO padding. affects all frequencies. Adjust only on MW 600KHz/500m
- C15 LW only LO padding. Adjust only on LW 176.5KHz / 1700m
- C1 : LW loop HF padding. Adjust only on LW 300KHz for max signal after
- C13 LW LO HF. Adjust only on LW 300kHz / 1000m to tune.
Alignment
a) Mechanical. Make sure extreme low frequency of dial is tuning capacitors fully closed and needle at the unmarked dots just above 1800m & 500m
b) Adjust in the sequence on diagram. Use full volume and as low an RF level as possible.
Step 1 & 3: Adjust C6 for frequency and C2 to peak signal on MW 1500KHz / 200m only.
Step 5: Adjust C13 for frequency and C1 to peak signal on LW 300kHz / 1000m only.
Notes
The large lid and thus large loop aerials make this a sensitive set. It's got very large battery packs to give long listening time.
To thank the Author because you find the post helpful or well done.