- Country
- United States of America (USA)
- Manufacturer / Brand
- General Electric Co. (GE); Bridgeport CT, Syracuse NY
- Year
- 1939 ?
- Category
- Broadcast Receiver - or past WW2 Tuner
- Radiomuseum.org ID
- 70883
-
- Brand: Musaphonic
Beitman
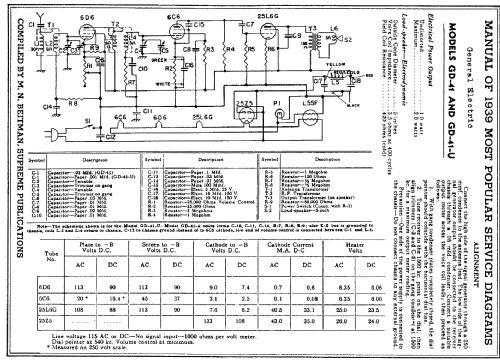
Click on the schematic thumbnail to request the schematic as a free document.
- Number of Tubes
- 4
- Number of Transistors
- Semiconductors
- L55F
- Main principle
- TRF without regeneration
- Tuned circuits
- 2 AM circuit(s)
- Wave bands
- Broadcast only (MW).
- Power type and voltage
- AC/DC-set / 115 Volt
- Loudspeaker
- Electro Magnetic Dynamic LS (moving-coil with field excitation coil)
- Power out
- 1 W (unknown quality)
- from Radiomuseum.org
- Model: GD-41-U - General Electric Co. GE;
- Source of data
- Beitman Radio Diagrams, Vol. 02, 1939
- Mentioned in
- Beitman Radio Diagrams, Vol. 02, 1939
- Author
- Model page created by Walter Wiesmüller † May 2012. See "Data change" for further contributors.
- Other Models
-
Here you find 2919 models, 2142 with images and 2046 with schematics for wireless sets etc. In French: TSF for Télégraphie sans fil.
All listed radios etc. from General Electric Co. (GE); Bridgeport CT, Syracuse NY
Forum contributions about this model: General Electric Co.: GD-41-U
Threads: 1 | Posts: 1
(Disclaimer: I posted this on antique Radio Forum back in Feb. Just getting around to sharing it here)
Hello everyone,
I wanted to share my restoration project with you. It's a radio that I got from a seller on Facebook Marketplace for $25. Initially, it was in terrible condition, with the cabinet damaged in several places and the veneer coming off. Additionally, the chassis was in terrible shape, covered in dust and mouse droppings. One of the tubes had a loose metal casing that came off, exposing the innards. It took me a while to clean everything up, and in hindsight, I probably should have worn a mask.
Since I intended to keep this radio for myself, some of my restoration practices may not count as true restoration, but I'm happy with the results. I removed all the tubes and the condenser and cleaned up the chassis with a wire brush and metal polish. I then sprayed the top and bottom sides, the condenser, coils, and the pot with contact cleaner. Next, I replaced all the old cloth-covered wire with new silicone-covered wire, which is more durable and easier to work with. I also followed John Fuhring's instructions for making a hot chassis cold. All the resistors were in spec, so I left those alone. However, all but one of the vacuum tubes failed, so I ordered new tubes.
While waiting for the tubes to arrive, I started working on the cabinet. I had to determine what wood was used for the veneer, and I settled on mahogany. I ordered a self-adhesive sheet from Amazon and removed the old veneer, being careful not to damage the lighter wood veneer, which was not damaged. I filled in all the chunks removed from the underlayment with wood filler, so the veneer would have good purchase. Furthermore, I painted all the black bits with Rustoleum black lacquer spray paint. When the new veneer arrived, I was surprised at how easy it was to apply. I didn't cut out the speaker, dial, and knob holes before attaching the veneer, but I had plenty of veneer to start over if needed. I used an X-acto knife and got them from behind and then shaped them. I stained it and sprayed everything with clear coat. I replaced the grill cloth and the dial glass, opting for a plastic replica. The new GE decal arrived yesterday.
With the cabinet done, I installed the new tubes when they arrived. To my surprise and pleasure, the radio worked and seemed to be aligned! However, the volume pot is a bit sketchy, and I couldn't fix it by cleaning it. I'll look for a replacement. If you know where I can find a new one, please let me know.
Overall, I'm quite proud of this restoration project, both electrically and in terms of the cabinet. I hope you like it too.
Nice activity! :-)
Please, no outgoing link (now in bold). I took it out in order that this can go to the model and therefore into the public.
It would be good to read in the HP-Link FAQ because your article shows very nice pictures, which would be better showing them directly in your article and not as attachment.
Attachments
- Top down view of the chassis when I received it (749 KB)
- This was a former mouse house (820 KB)
- Original electronics (926 KB)
- Caps and wires replaced. Old wire was janky (931 KB)
- Top view of cleaned up chassis (887 KB)
- Sad looking cabinet (923 KB)
- Removed mahogany veneer (834 KB)
- Protecting what is left of the original label (782 KB)
- Restored cabinet (601 KB)
- Finished project (951 KB)
Troy Brokenshire, 12.May.23